
 When preparing the “Rose Granny Square”-tutorial a couple of months ago, I had to crochet several new squares myself and really enjoyed making them again.
A friend saw the new bright and happy squares and asked me to make a baby blanket for her little niece.
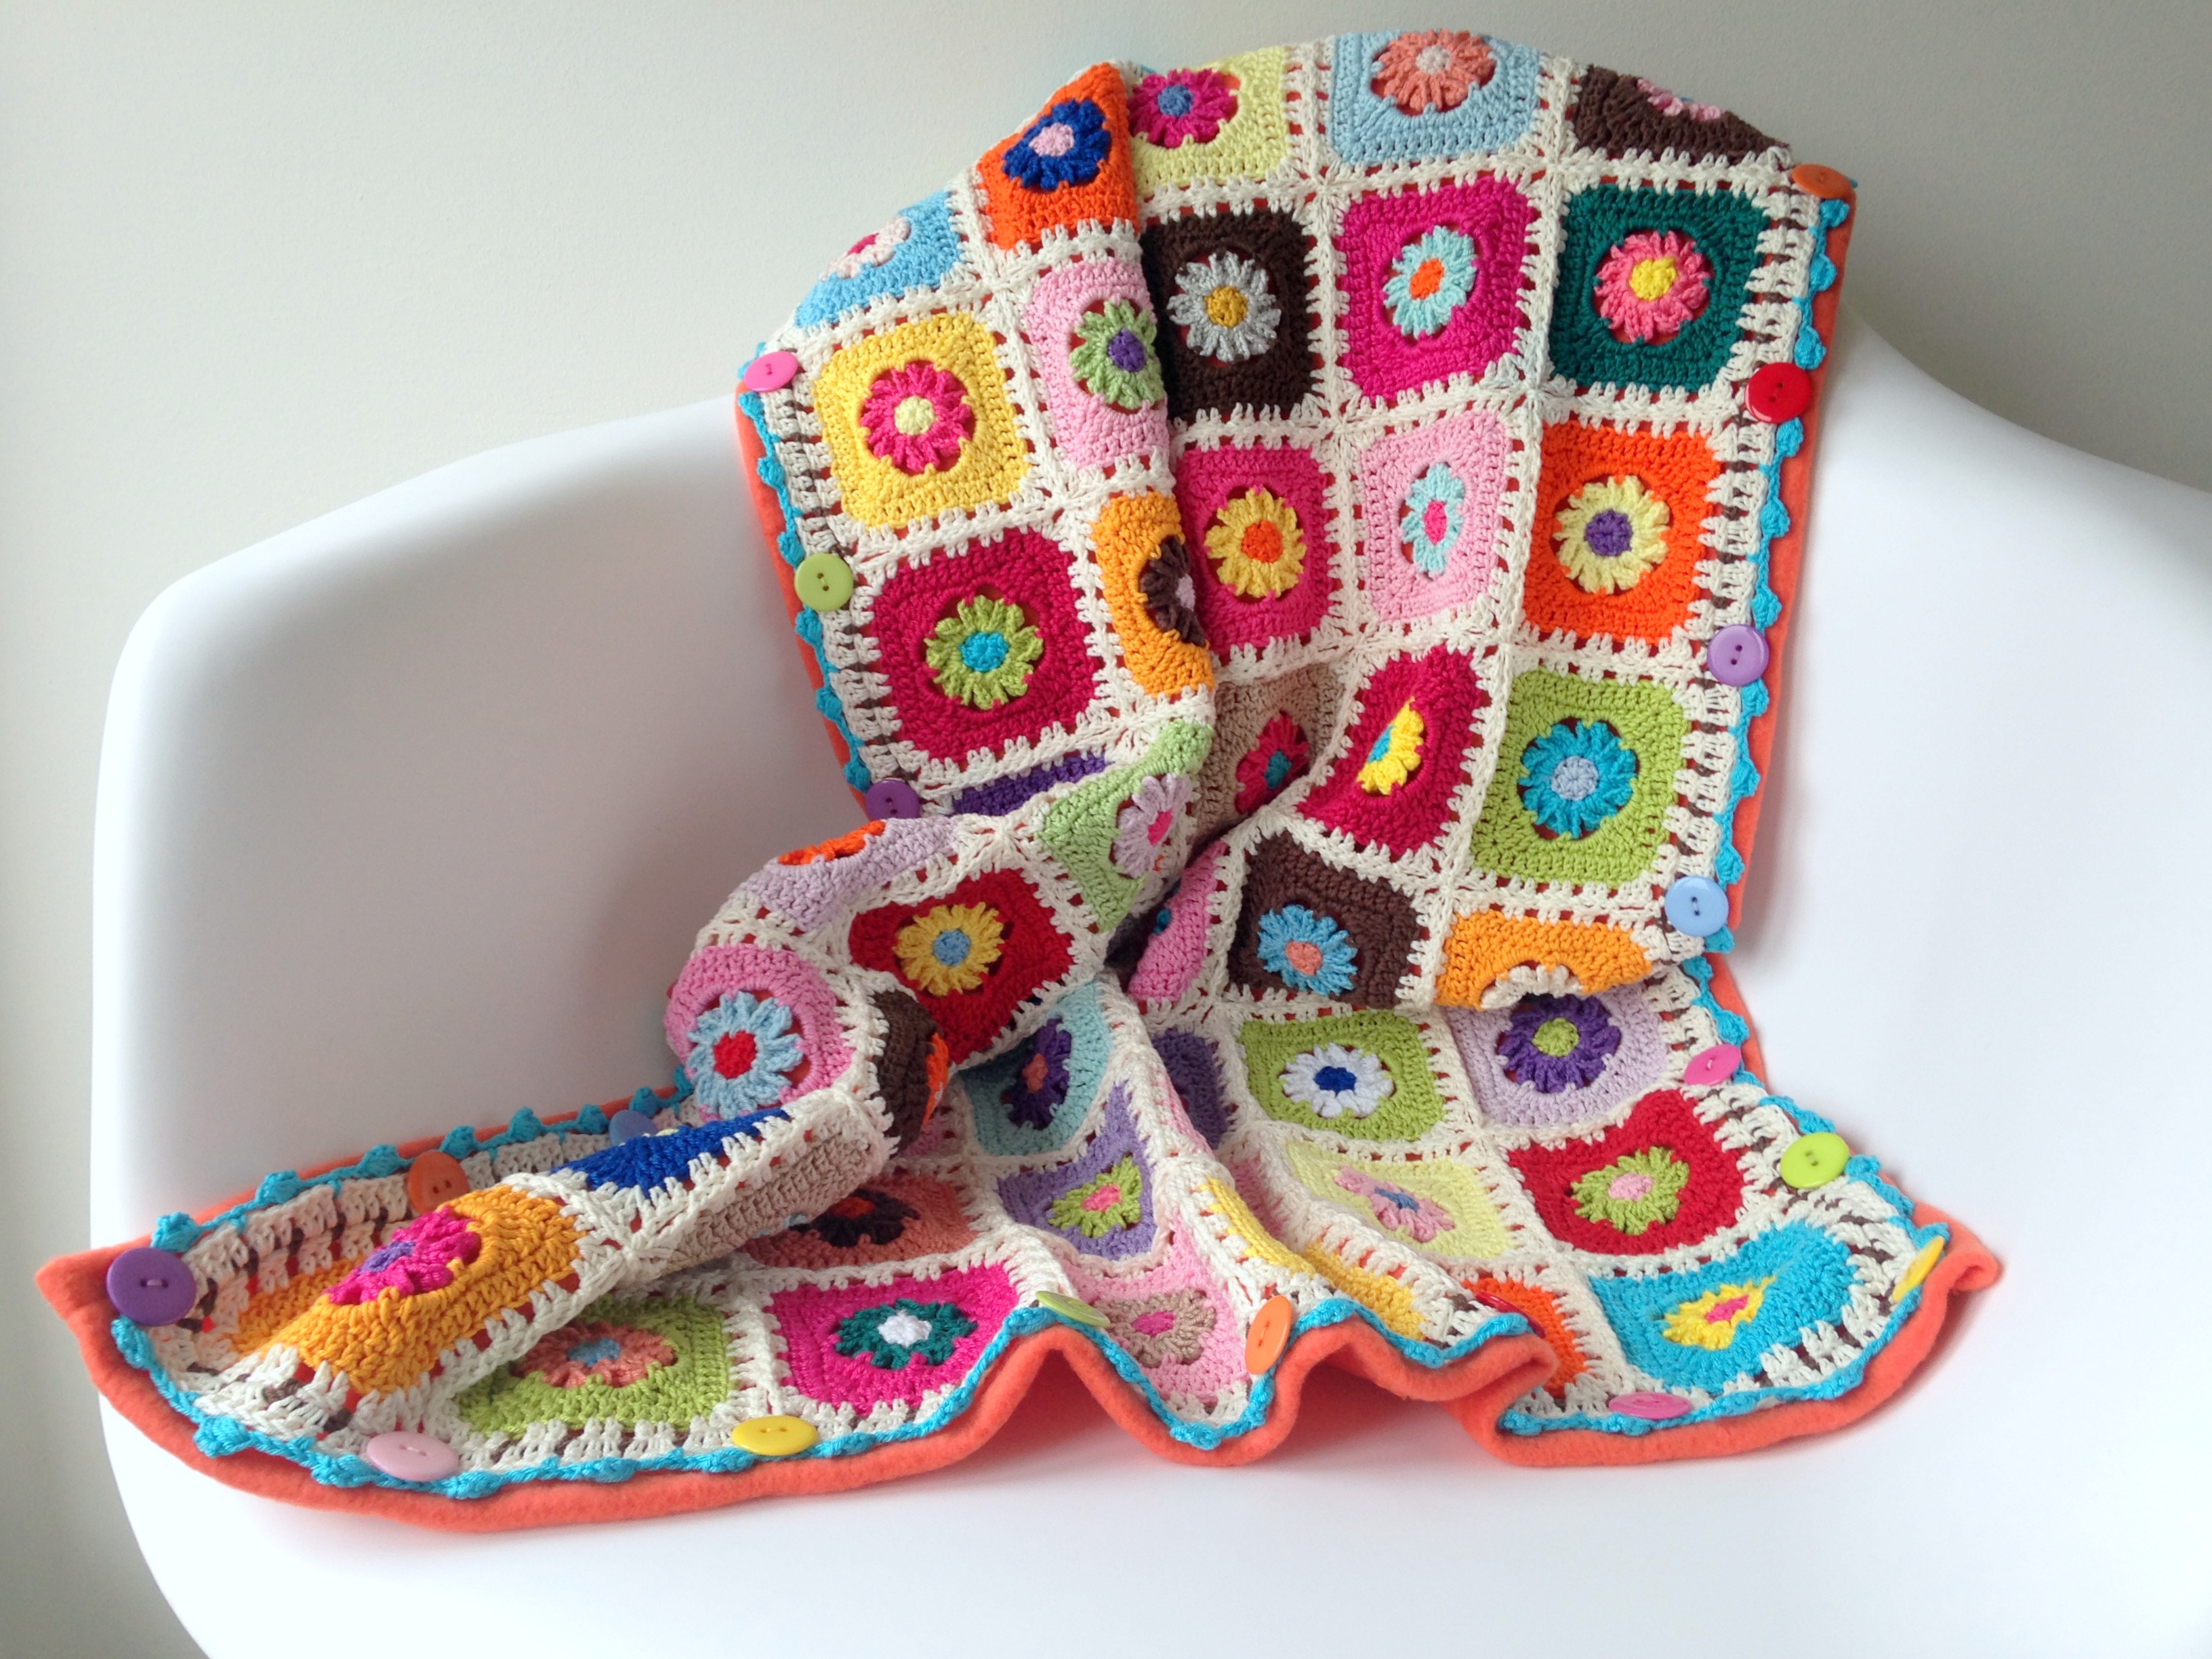
While discussing colors and size, she said she would like this blanket to have the same fleece backing, as the big one I had originally made with these granny squares.
I liked that idea very much, but came to think that this would restrict people from using the blanket year round. It would obviously be way too warm in spring and summer, whereas the blanket consisting just of the cotton squares would be too cold in fall and winter …..
That’s when I decided I’d try to make the back of the blanket removeable!
However, I first had to come up with a way to join my new “Rose”-squares.
No matter how much I still like the look of the joins on the big “Rose Square Blanket“, in retrospect there’s only one conclusion: too time consuming.
So I needed to search for a different type of join, preferably a continuous one.
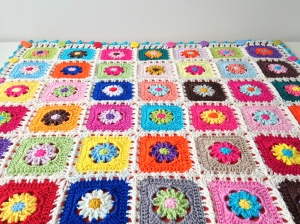
I tried the flat braided (continuous) join (tutorial here), but wanted a more substantial stitch, preferably a double crochet/treble stitch. The pattern of the square only giving me 14 stitches on each side, made it quite the puzzle to evenly divide the stitches, but I figured it out ….. eventually, and I’m very pleased with the result.

If you want to give it a try too, here’s what I did.
Just keep the continuous join as you go-technique in mind, adjust your stitches, follow the chart and you’ll zoomingly crochet your “Rose Granny Squares” together!
How to join your “Rose Granny Squares”
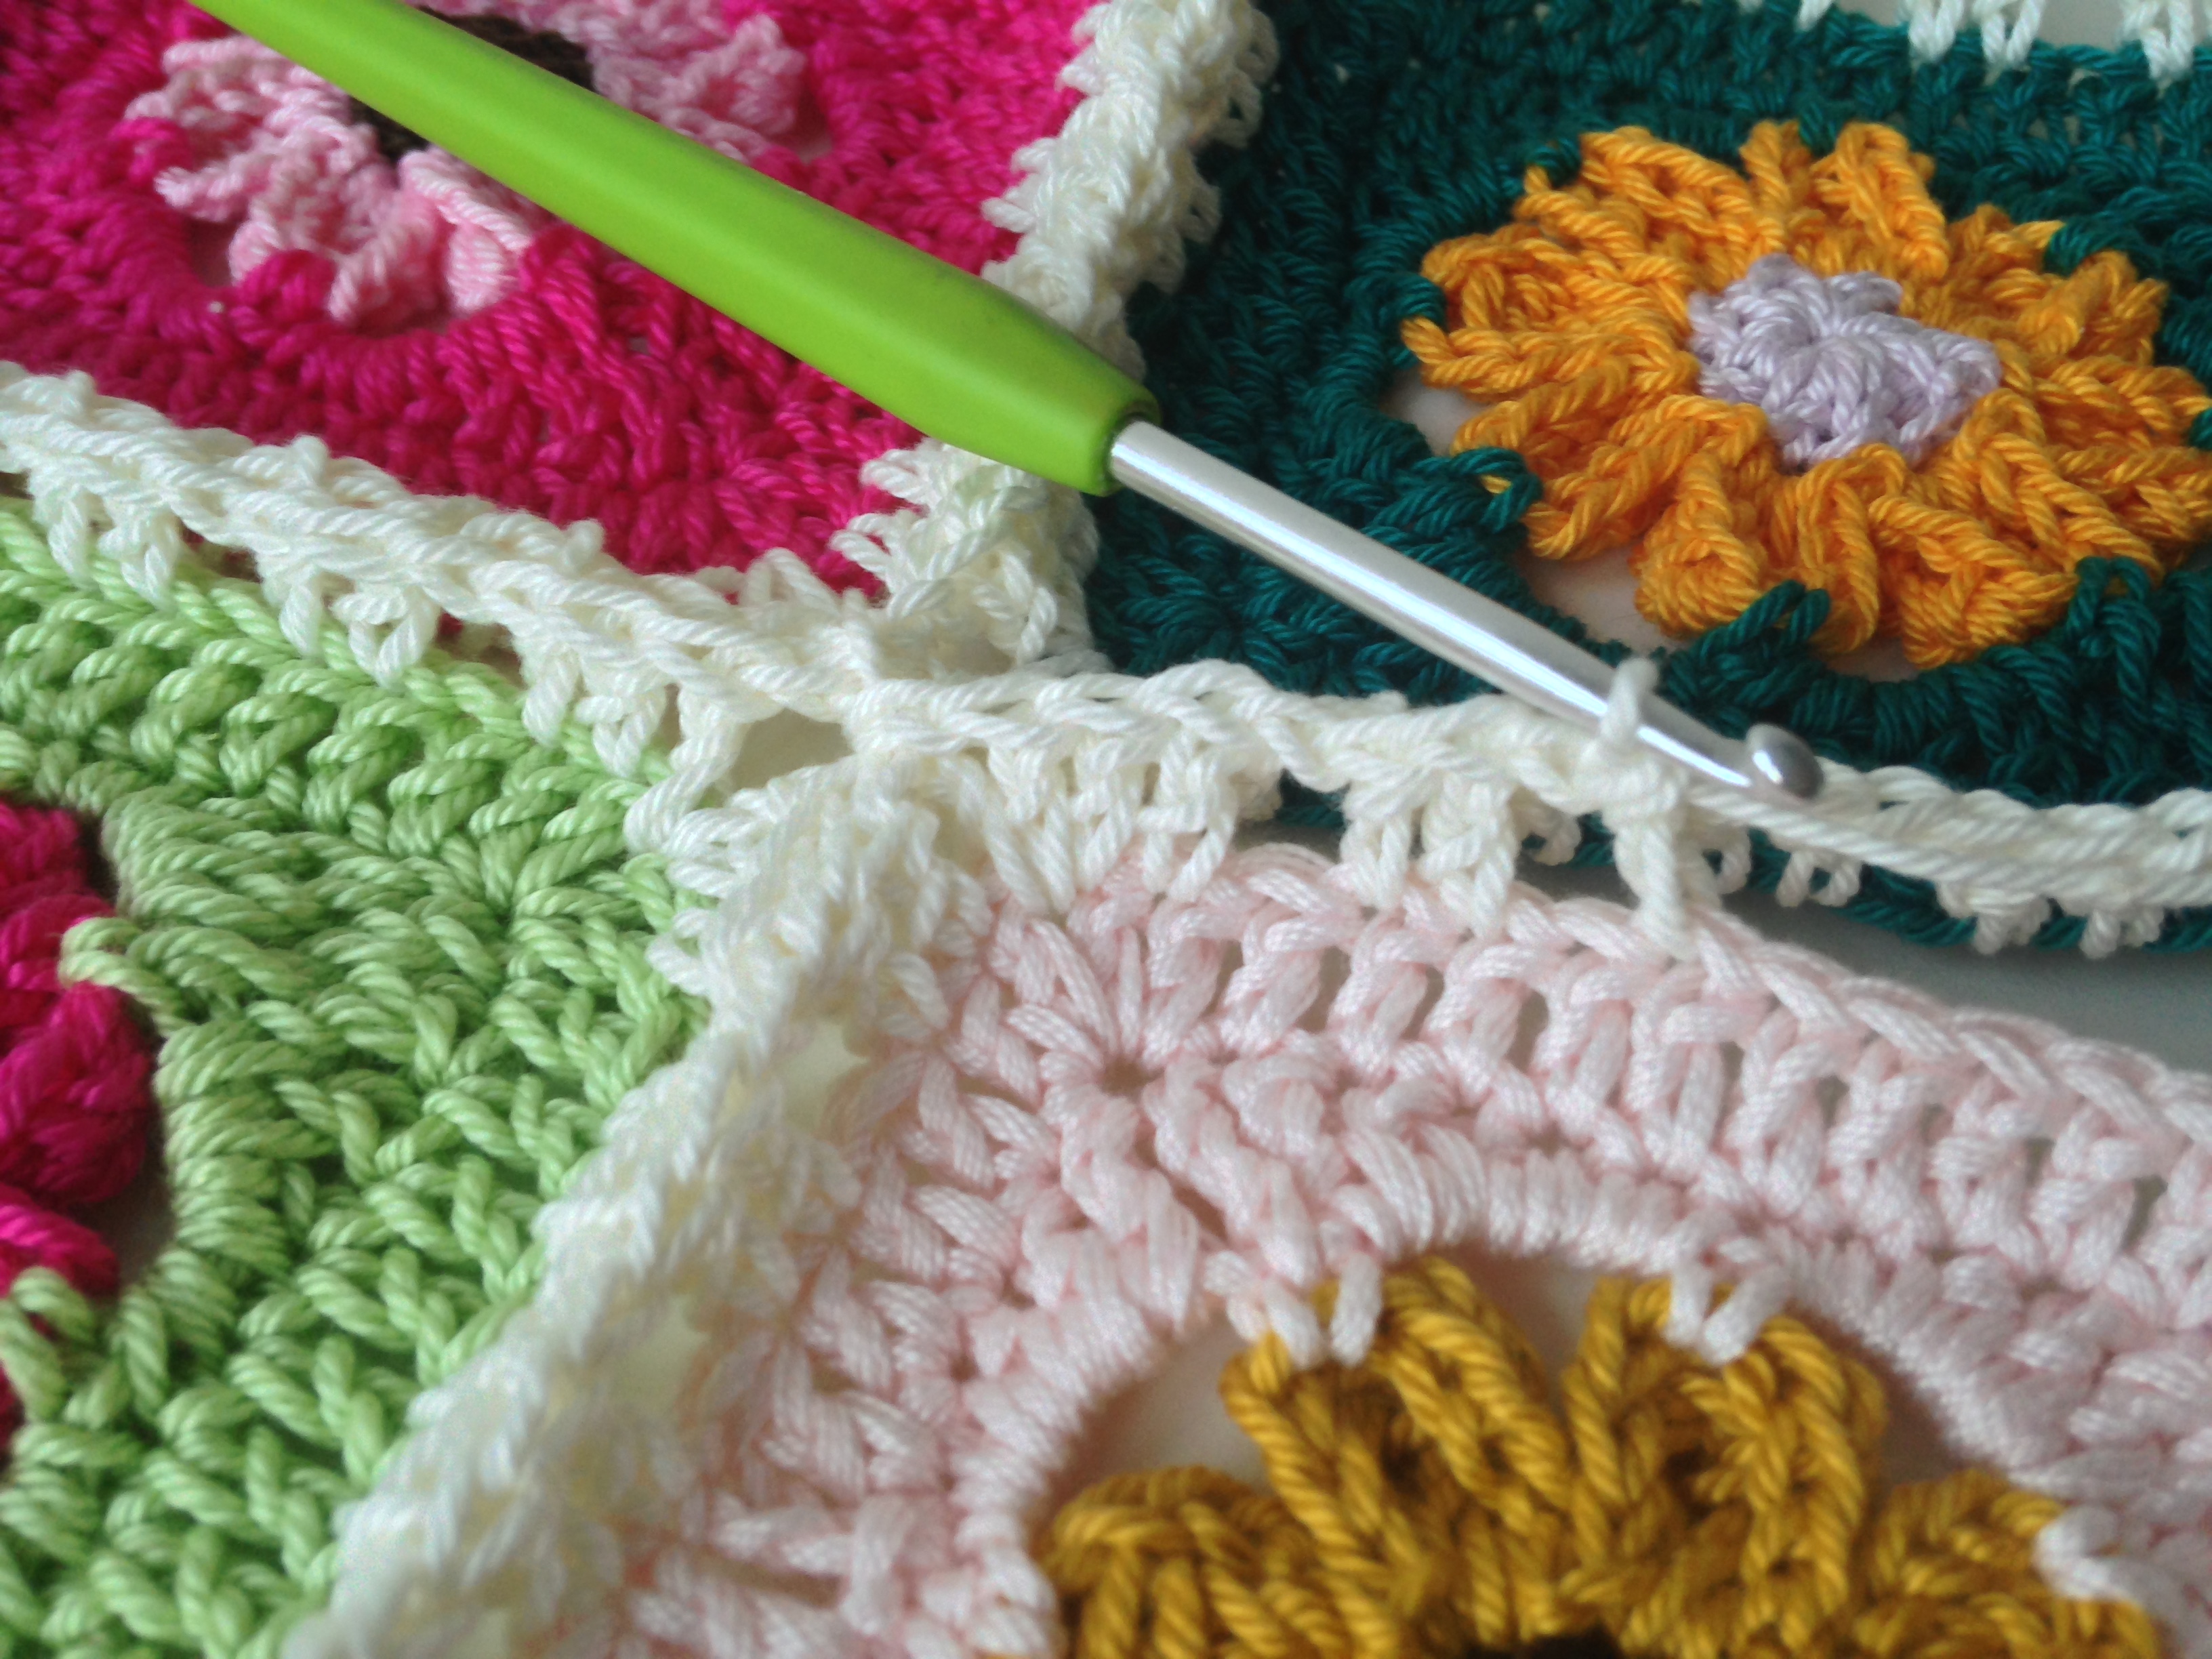
 The “Rose Granny Square” has 14 stitches on each side. It’s best to start in a corner, right in the middle of the 4 corner stitches of the previous round (so 2 dc’s on each side when you insert your hook). Begin with 1 dc, 2 chains and one dc, first corner made.
After that you’ll continue with 1 dc, 1 dc (so, one dc in every stitch, making sure you don’t miss that first dc of the previous round – the stitch is kind of hiding right next to the last corner stitch), one chain – skipping one stitch of prev. round, *1 dc, 1 dc, one chain – skip one stitch *, repeat from * to * 2 more times.
In total you should have 4 sets of 2dc/one ch on this side of the square. Now you’ll crochet 2 dc’s in the last two stitches of the previous round (stitches 13 and 14) and in between the 4 corner dc’s from the prev. round you’ll crochet 1 dc, 2chains, 1 dc (2nd corner made). Continue to crochet all around your square.


You’ll want to do this with every square, it really works very well using the continuous join as you go-technique!
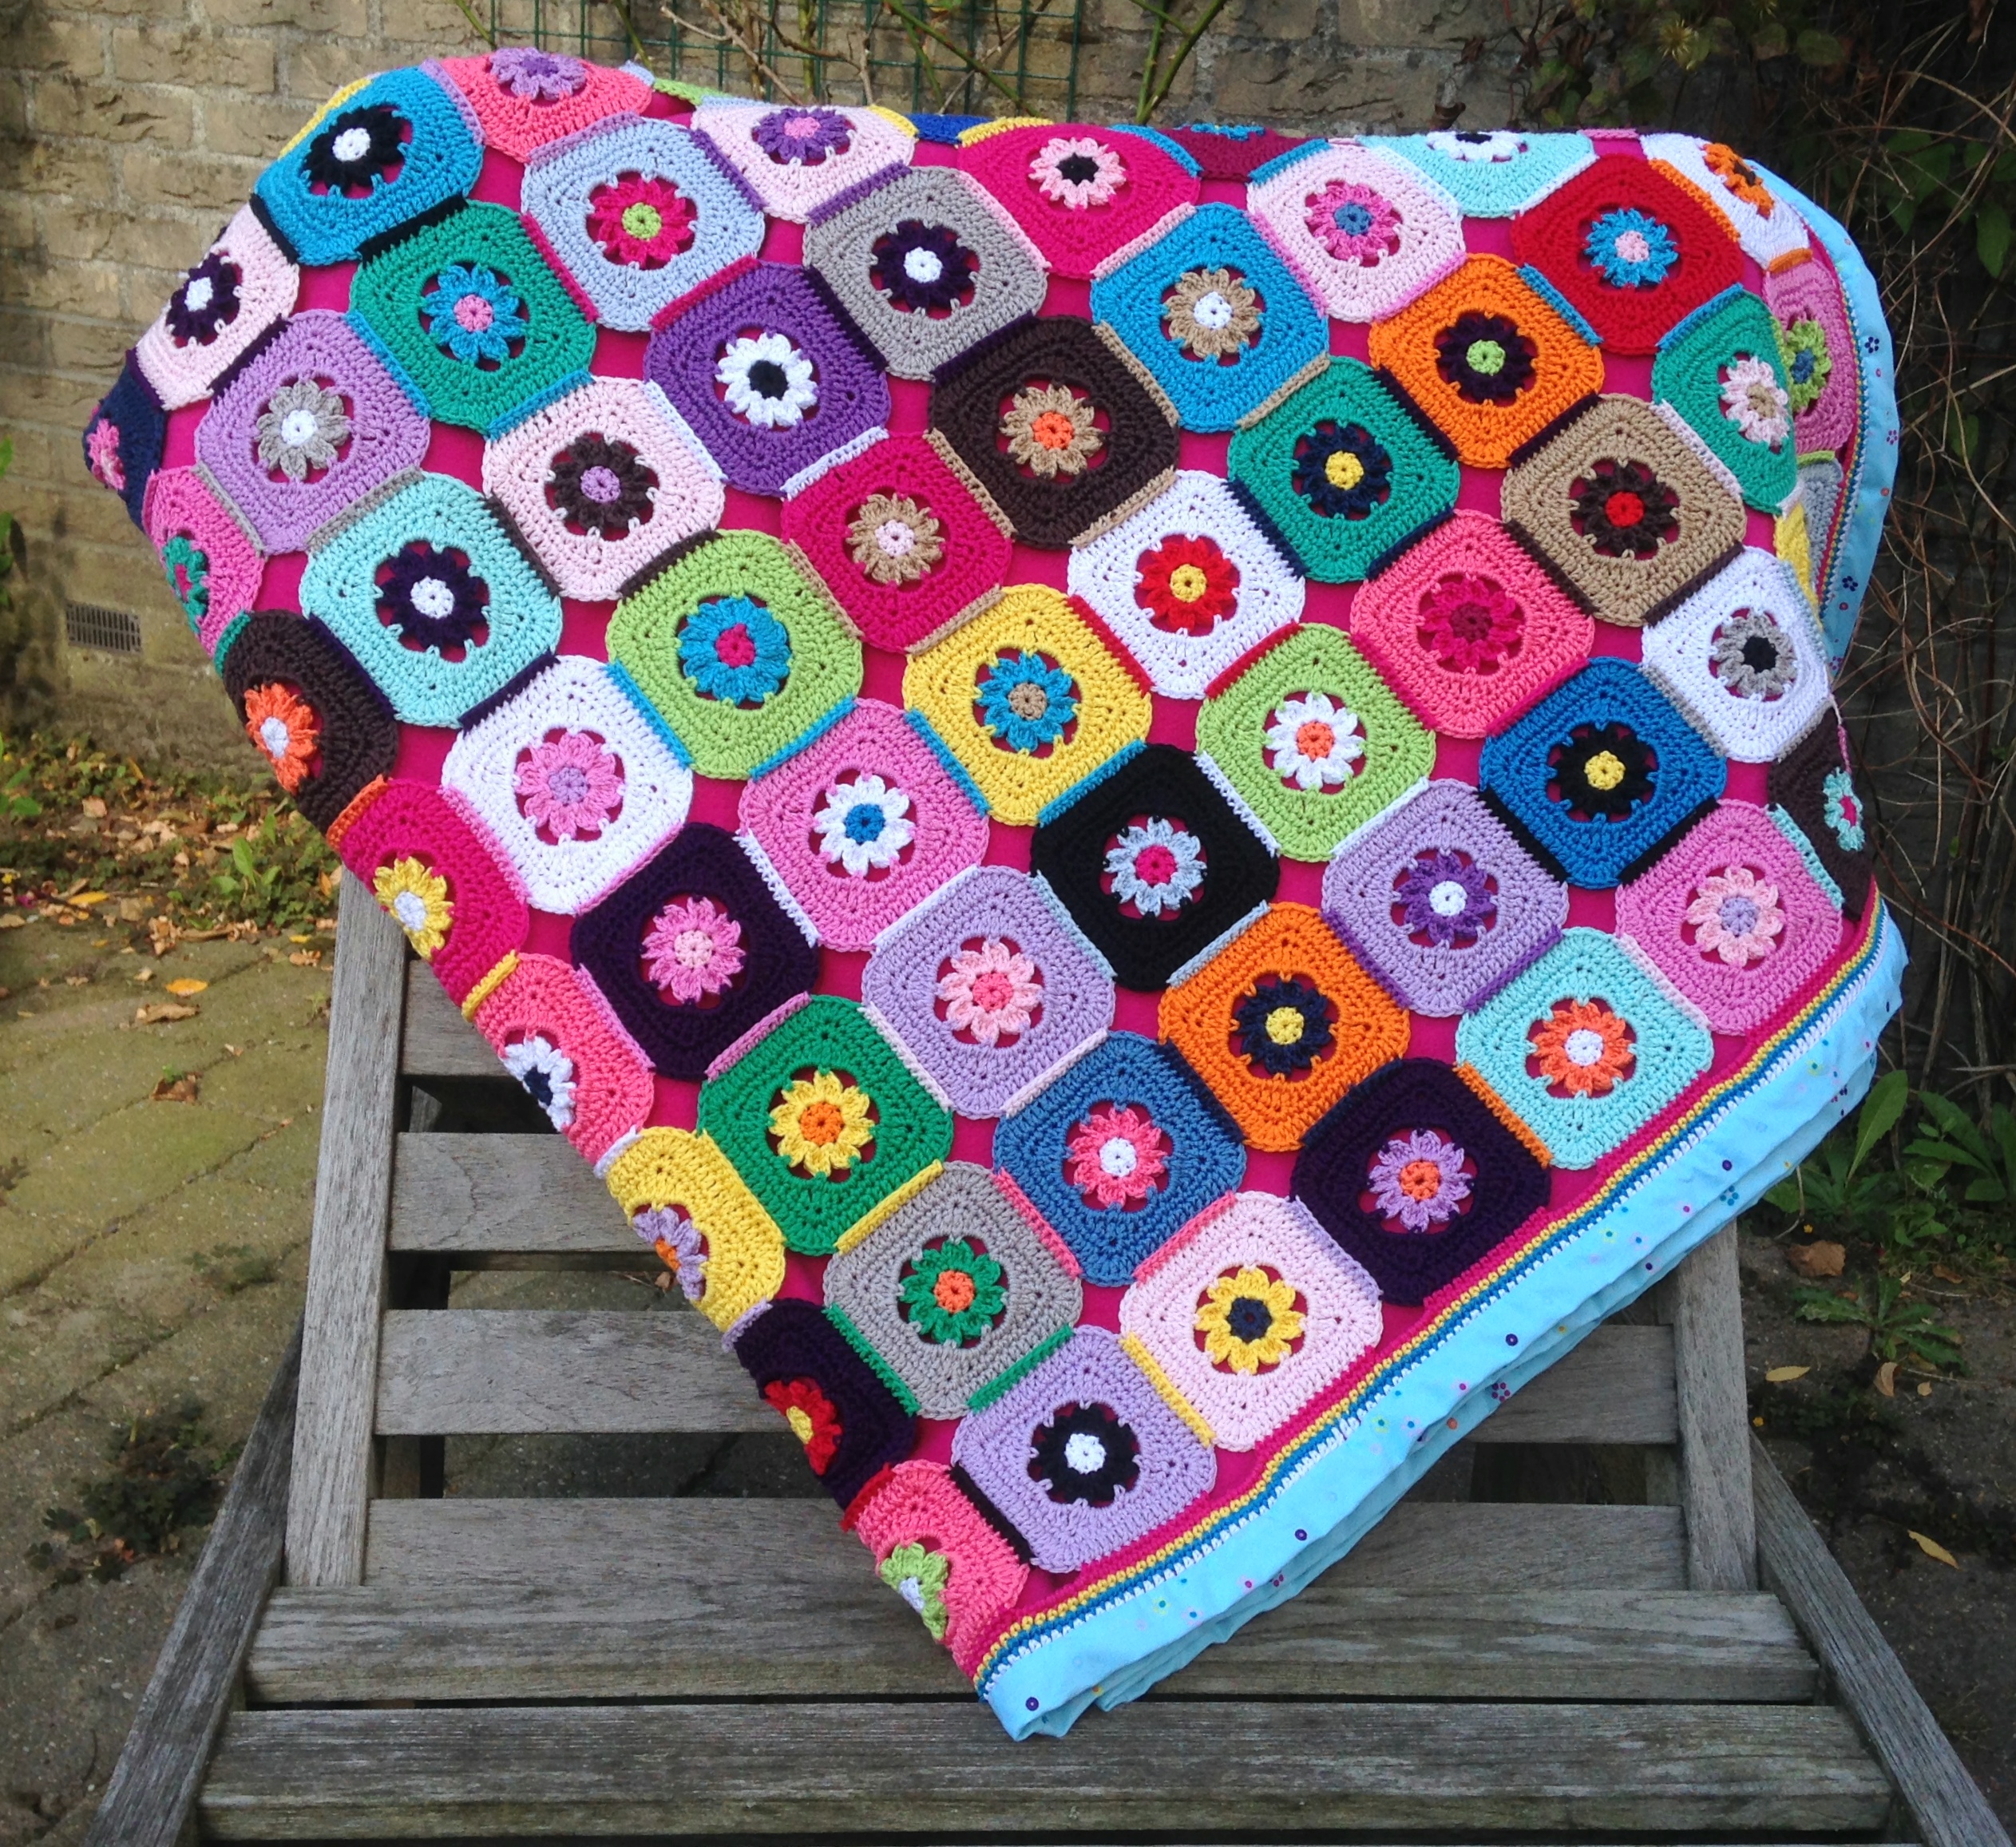
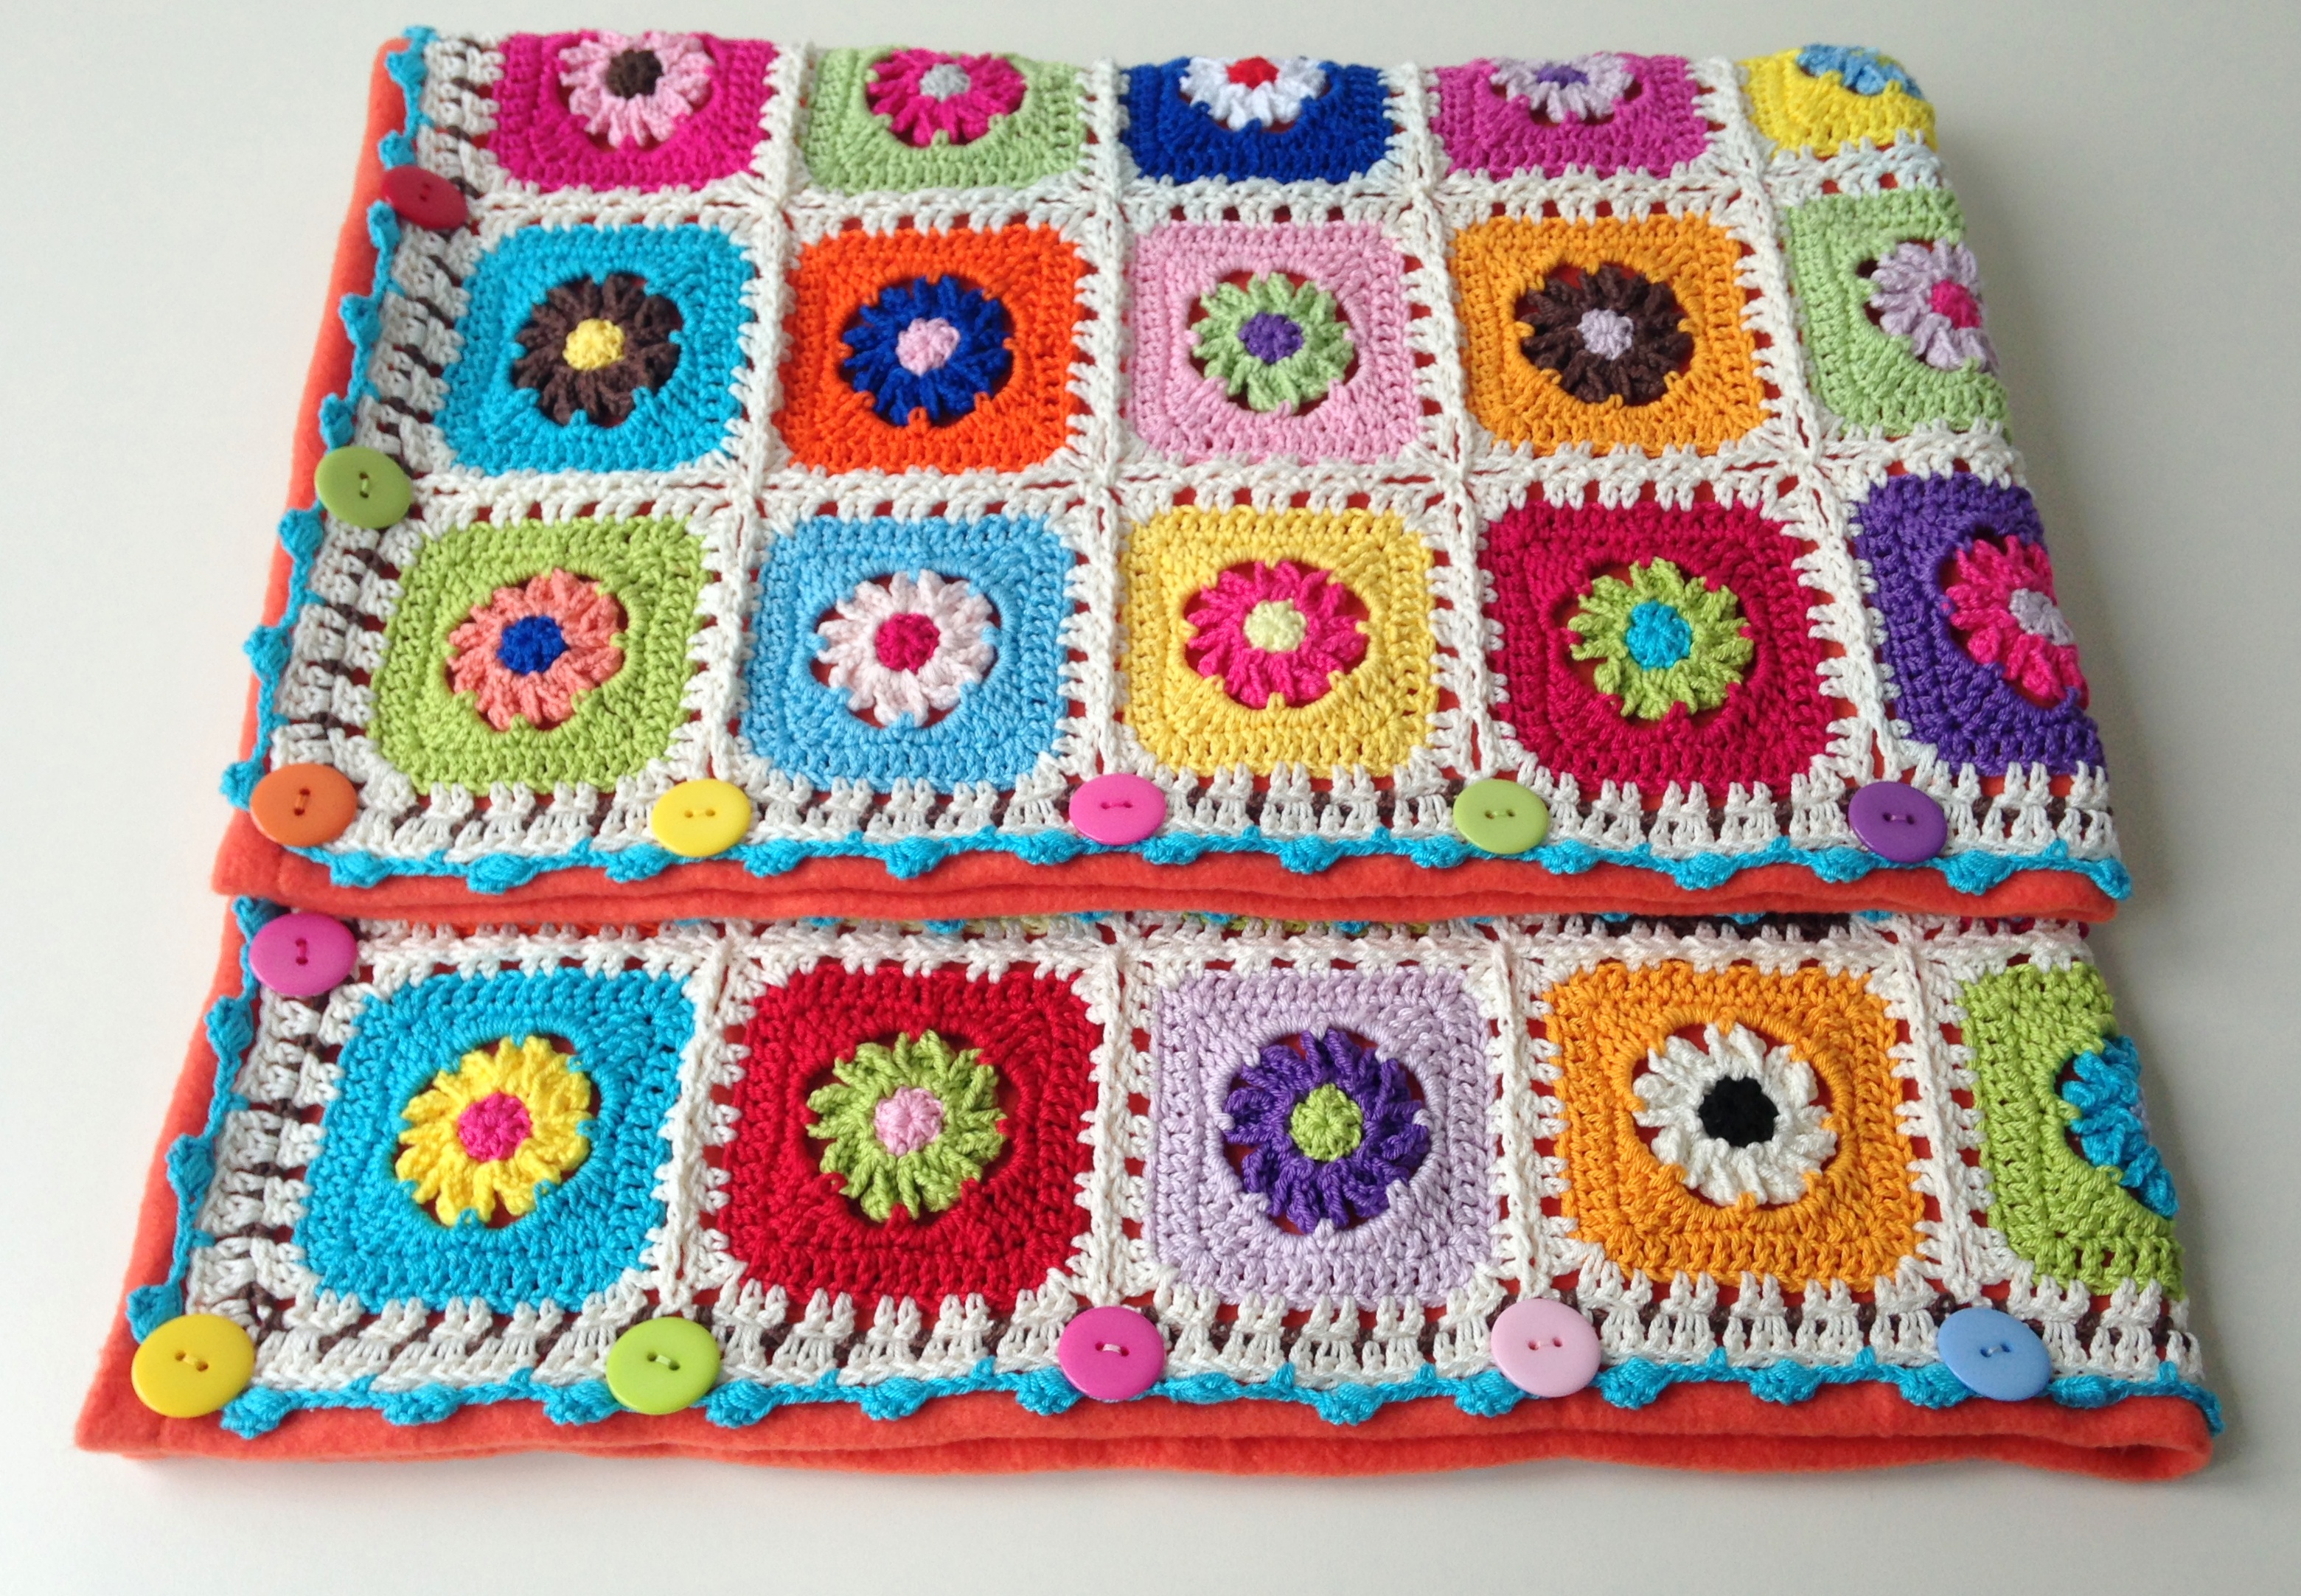
The next little challenge was the border: I always love this part of a crochet project! Since I planned on attaching a removable fleece backing using buttons, button holes were needed, this being the more elegant option when compared to velcro……
Precisely where two squares joined, as well as in the corners, I crocheted a small opering (skipping 2 st from prev. round, chaining 2) – just big enough for the buttons to fit through.
 The last round on this border in bright blue was quite the puzzle to get right, but after a couple of tries, this is how I liked it best.
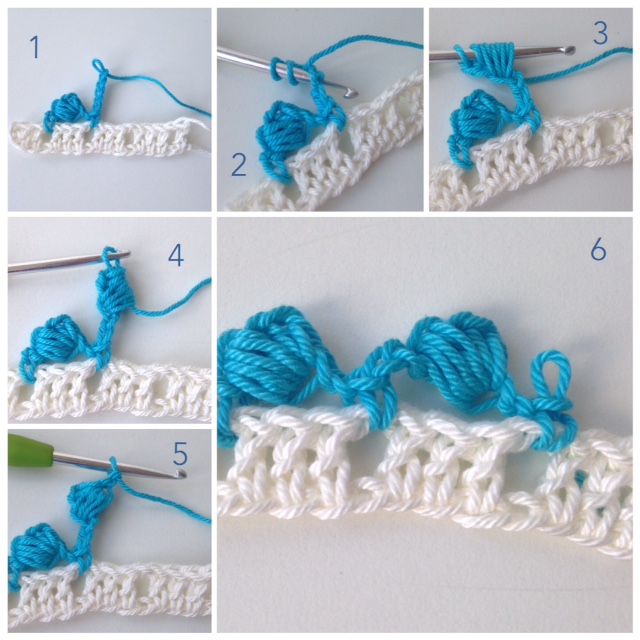
The blue part of the border is crocheted like this:
Attach yarn, chain 5, yarn over, insert hook in 3rd chain from hook, pull up a loop – leaving yarn on hook. Yarn over, inserting hook in same chain, pulling up a loop 3 more times, leaving all loops on hook. Total loops: 9. Yarn over, pull yarn through all loops, chain two, sc in next space.
After having the crochet blanket washed and blocked, I cut and seamed the fleece backing, sewed the buttons – all 32 – to the orange fleece and ta-dah!


 I soooo love it when an idea works out just the way I’ve planned it in my head: very, very happy with this multi-season baby blanket!


Love,
Marianne


Hoi Marianne,
Ik heb al heel vaak foto’s van je haakwerkjes voorbij zien komen, maar was nog nooit op je blog geweest. Wat een mooie dingen haak je, en van deze granny was ik helemaal weg. Ik ben zelf ook aan een deken begonnen, en blog daar de komende weken over. Natuurlijk plaats ik een link en hoop dat nog veel meer haaksters je geweldige blog gaan lezen.
Grtz,
Chris
LikeLiked by 1 person
Ha Chris,
Ah, dankjewel, wat een prachtige complimenten – ben ik oprecht blij mee! En wat ontzettend leuk dat je met deze granny een deken aan het maken bent, echt super! ‘k Zag dat je al een mooie stapel klaar hebt, zo leuk! Marianne xx
LikeLike
Love everything and anything of your blanket! Soo pretty times 1000! Colorful ad clever!
LikeLiked by 1 person
Thank you so much, dearest Andrée, for your lovely compliments! Appreciated times 1000! Love, Marianne xx
LikeLiked by 1 person
i just love love love your method. I thought I was the only one who backed her blankets a) to keep the shape, b) to retain the lifespan of the product. but being in a tropical climate I have the same issues.
I just wanted to say to you that my husband is a patent attorney and he suggested you go to google patents and see if anyone is using your method. It doesn’t matter if there are other methods but as long as yours is unique in a certain way you can take out an IPT (international patent treaty that is approx $99 Australian dollars for a year) and anyone who uses your method without your express permission is in breach of the patent. So effectively it could prove a lucrative little sideline. along the same lines if you have your own crochet designs and you really wanted to you could also do the same with them. But if comes down to a unique quality.
I love it, i hope you don’t mind me using your idea, I will happily pay a fee and I wish much success and joy. You certainly bring me joy. Lorraine xx
LikeLiked by 1 person
Dear Lorraine,
First of all: thank you so very much for your lovely compliments on my blanket – so happy you like it as much as you do. Yes, isn’t backing a crocheted blanket a great idea?
Secondly, I really appreciate your information on the patent situation, thank you (as well as your husband) for this. I do want this particular project to be a free one though, which I hope a lot of creative people out there will enjoy!
I’d love you using it as well – your “fee” being sending me a photo of your finished blanket? Love, Marianne xx
LikeLike
With pleasure my love, and thank you again for your creativity and kindness
LikeLiked by 1 person
Such a bright and colourful blanket! Just gorgeous :)
LikeLike
Thank you so very much for your lovely compliment, Mandy! Marianne xx
LikeLike
Oh, this is so, so beautiful! The removable backing is genius and definitely an idea I will use in the future. The joining method is a great tutorial too and I love the imaginative border – one I’ve not tried before.
LikeLiked by 1 person
Thank you so very much for your lovely compliments, Sheila – made me very happy! Marianne xx
LikeLike
I love this blanket! You did a beautiful job. I’ve been wanting to do one of these myself as I’ve never done it before and seen your Afghan makes me want to start one right now.
LikeLiked by 1 person
Thank you so much for your sweet compliment! Have fun crocheting! Marianne xx
LikeLiked by 1 person
Absolutely stunning! I soooo need a sewing machine to add more fun to all my crafting :-)
LikeLiked by 1 person
Thank you so much for your lovely compliment, Annick – truly appreciated! Haha, I guess you do – sewing really does add to the crafty fun! Marianne xx
LikeLiked by 1 person
I just found your site through a link from elsewhere on the ‘net – and I’m so very happy to find you! Your work is absolutely beautiful! And thank you so much for sharing! What an awesome idea for the fleece backing for this blanket! How clever are you?!
Thanks for sharing! I’ll be dropping by to visit frequently – keep the coffee hot! :>)
Thank you again for sharing your beautiful work! you are so very talented.
LikeLiked by 1 person
Aw …. thank you so very much for your lovely – and much appreciated – compliments, Carol! I’m blushing, but mostly tickled pink to hear you’ve enjoyed your first visit and will be back again soon – you bet, that coffee will be ready any time! Marianne xx
LikeLike
I shared!! Just beautiful!
LikeLiked by 1 person
Thank you so very much, dear Sandy – truly appreciate it! Marianne xx
LikeLiked by 1 person
Your so welcome Marianne!! xx
LikeLiked by 1 person
Wow! That’s still a lot of work and your design is brilliant. I hope you were well paid for your skills. It’s wonderful.
LikeLiked by 1 person
Thank you very much for your lovely and much appreciated compliment, Kim! Marianne xx
LikeLike
this is such a brilliant idea – the fleece backing and the button fastening – love it.
LikeLiked by 1 person
Thank you very much for your lovely – and much appreciated – compliment, Rachel! Marianne xx
LikeLiked by 1 person
Very pretty!
LikeLiked by 1 person
Thanks so much for your lovely compliment, Rhonda! Marianne xx
LikeLike